Think building a PVC cat tree is hard? Think Again!
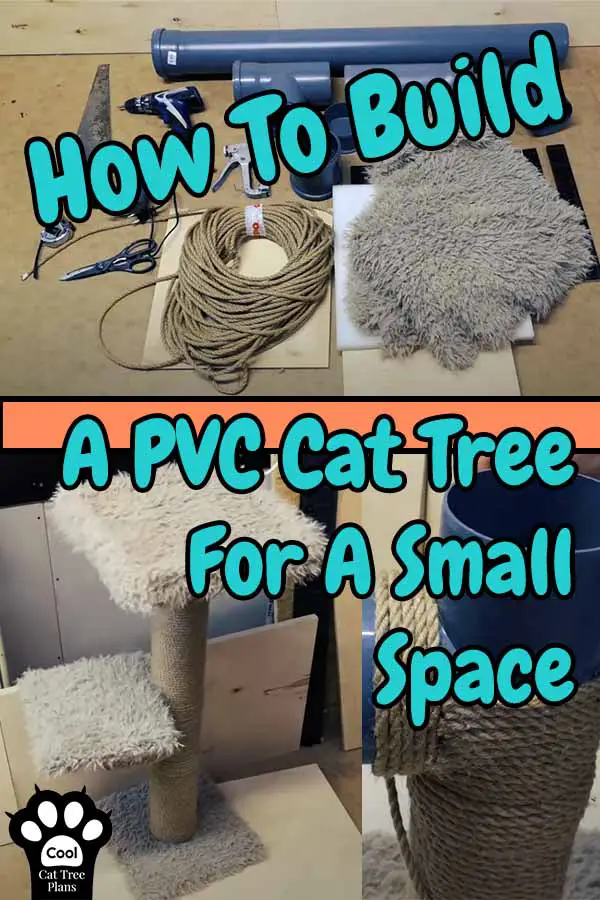
Hey everyone, today we’re gonna show you how to build a PVC cat tree for a small space. This is a super easy build that won’t break the bank. It’s covered in sisal so this little cat tree doubles as a cat scratcher, too. Its small size makes it great for under windows or next to your desk.
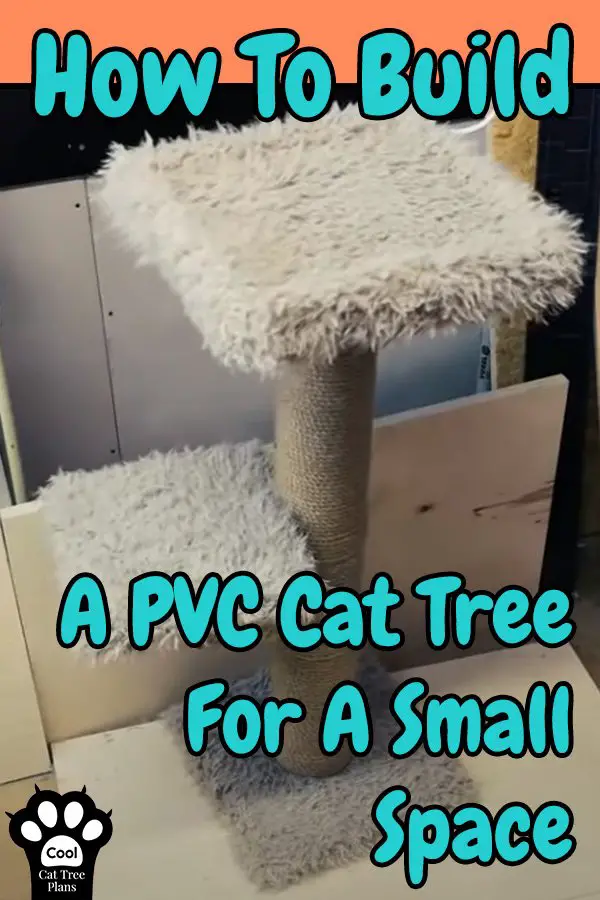
Your bush-dwelling cats are gonna LOVE this little beauty. It sports two spots for your kitty to hang out. A cozy cat bed with raised sides up on the top and a fun platform lower down and off to the side. Of course, as you can see in the image above, the whole structure is covered in sisal rope for lots of scratching fun.
Don’t worry if you don’t have a fully decked-out shop. The only tools you need for this build are a screwdriver (power drill), hot glue gun, staple gun, level, box cutter, tape measure, permanent marker, pencil, and handsaw. Easy peasy, right? Remember, if you don’t own a power drill you can always rent one from your local home improvement store.
That said if the woodworking bug has bitten you and you want to make a beautiful heirloom work of art for your cats and your home we suggest you take a look at these ===>> Professional Woodworking Plans & Instructions.
Many thanks to our friends “craftzars” over on Youtube for putting this great project together. We encourage you to watch the video (found at the bottom of this post) all the way thru several times before beginning your build.
If you are going to build this EXACTLY as shown in the video here is what you are going to need. The one change I would make is to have all the platforms (including the base) be 16×16 inches. That way it will be much easier to get your cuts made if you choose to have them cut the plywood for you at the home improvement store. Also, bigger bases are always better, right?
Materials List
1x D110-1000mm sewer pipe
1x D110-250mm sewer pipe
1x D110/110 sewer pipe triangle
3x D110 sewer pipe cups
1x D110 sewer pipe 90 angle
1x D110/110 sewer pipe coupler
1x 6mm x 60m sisal rope
1x 30x30x1.2 cm plywood for first step ((12×12 inches))
1x 40x40x1.2 cm plywood for cat bed ((16×16 inches))
+4x 39x4x1,2 cm plywood for bed walls
+1x 40x40x2 foam cushion
1m artificial fur fabric or fleece.
1x 35x35x2.6 cm plywood for base ((15×15 inches)
some screws and glue sticks (this is a nice hot glue kit we found on Amazon)
Gravel, rocks, or sand.
Building Your PVC Cat Tree (don’t worry it’s easy).
Ok, now that you know what you need to build this cat tree let’s get started. Remember, take your time and have fun. You can do this.
Start by prepping all of your PVC pipes by cutting off the nubby lip along the edges. As you can clearly see in the video this is not difficult to do with a handsaw. However, if you have access to a bandsaw it will go much faster.
Building Your Platforms
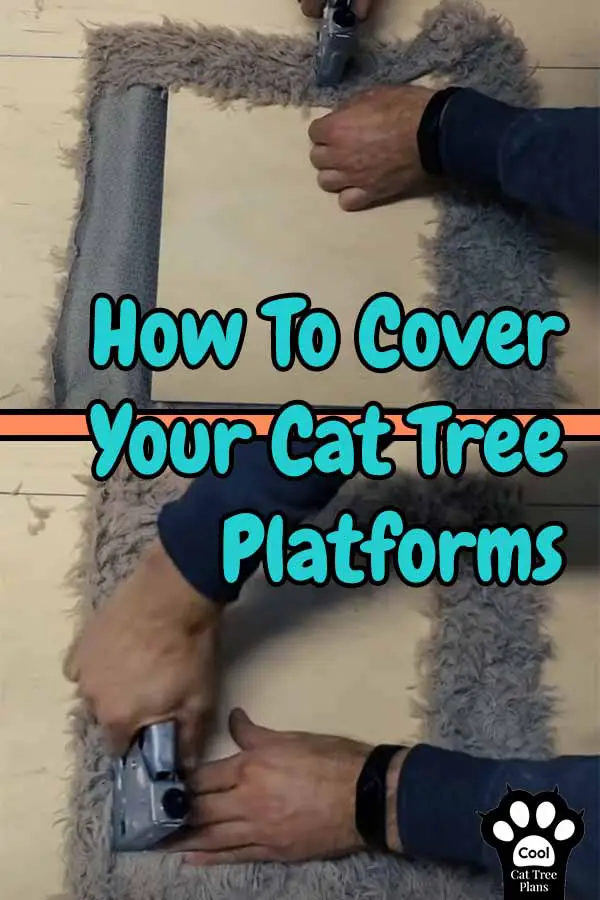
Next, let’s cover the piece of plywood you are using for your base with the faux fur, fleece, or other fabric you have chosen. You don’t need to do any exact measurements here. Just place your board onto the backside of the fabric and cut out a square a few inches larger on all sides than your board.
Place the board in the middle of the cut square, fold the edges around it and staple tightly. Be sure to put one staple on each side and keep working your way around to ensure even tension. Don’t worry about using too many staples. With something like this too many is better than not enough.
PRO TIP: If you have elected to use something like denim or other non-fluffy fabric to cover the platforms of your cat tree be sure to add a layer of quilters batting under it to give some comfy padding for your cats. (You could also upcycle an old blanket for this purpose.) Not to mention something for their claws to dig into.
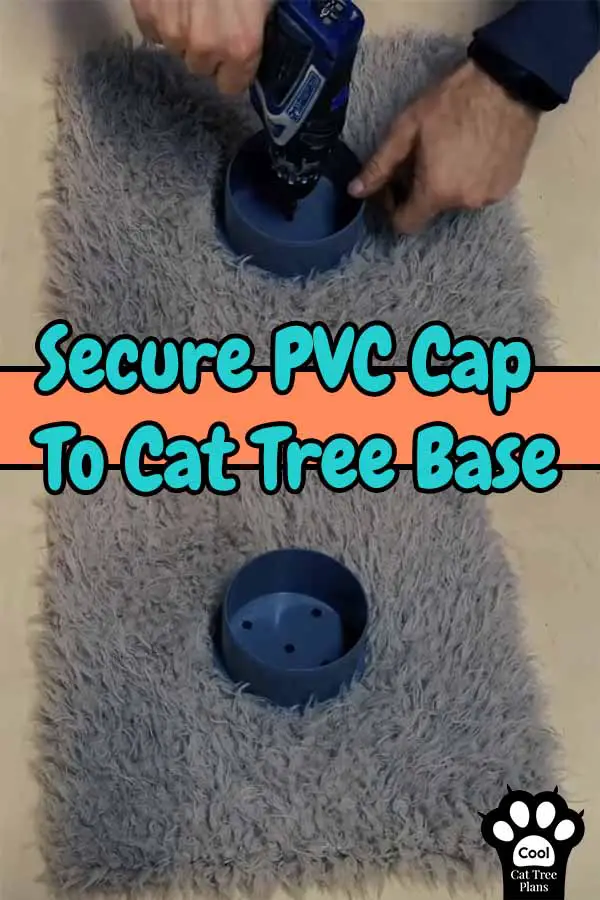
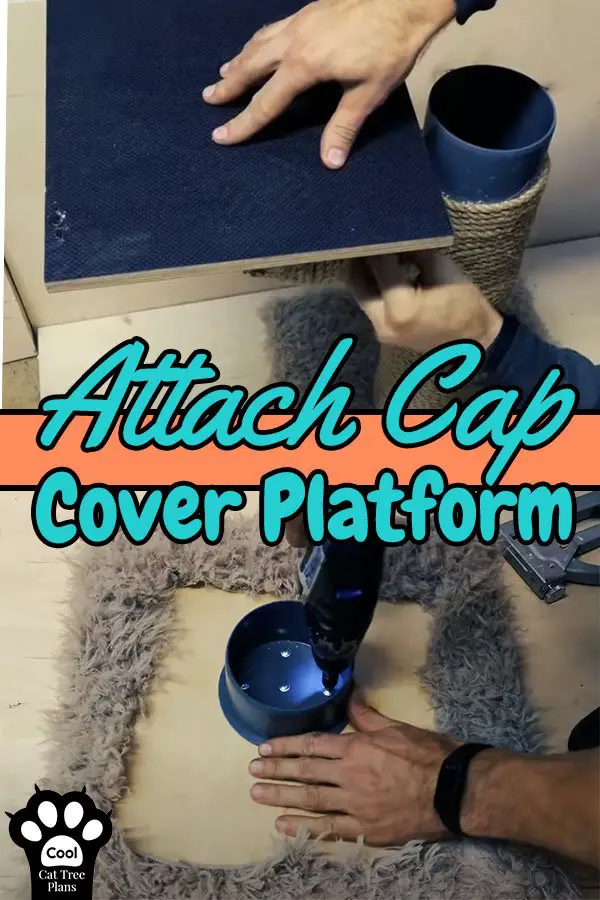
Now flip your covered board right-side up. Place one of the pipe cups or caps flat side down into the center of the fabric-covered board. Screw it securely into place. Again, more is better than less here. Make sure it is SECURE!
At this point, it’s time to finalize the height of your build as shown in the video (in case you forgot, it’s at the bottom of the page). You will want to cut the rest of your pipe sections and heat up your glue gun.
Measure, Cut, Glue & Wrap: Assembling Your PVC Cat Tree.
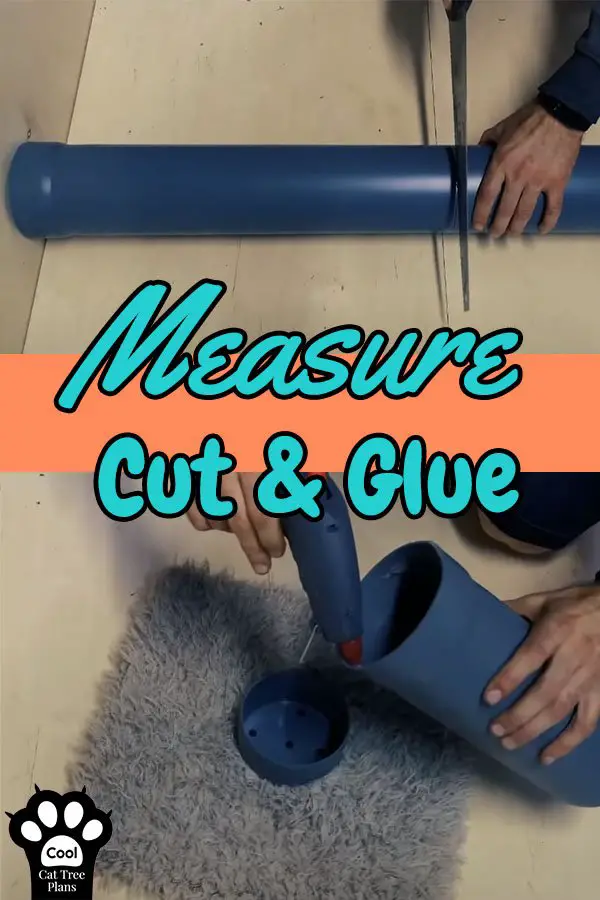
Run a healthy bead of hot glue around the inside edge of the piece of pipe you are using for the base of your build. Push it firmly down over the sewer cup.
You are going to wrap this section of pipe with sisal rope before adding more pipe. This will be the process throughout building this cat tree to make wrapping easier and prevent tangling of your rope.
Put a healthy dollop of hot glue at the very base of your PVC pipe right in the corner where it presses into the fabric covering. Press the end of your sisal rope into this glue and start wrapping the rope tightly around the pipe.
Working With Sisal
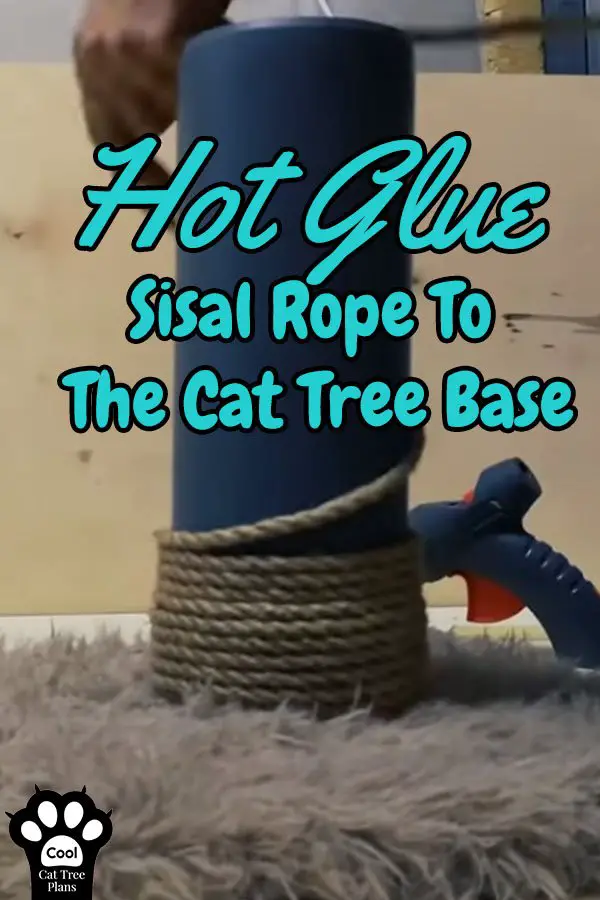
Place a dollop of glue every few wraps. This way if your kitty manages to pull it free in one place or even scratch thru it the whole thing won’t come unraveled.
PRO TIP: Always cut your sisal rope at an angle. This helps it blend in with the rope on the cat tree and gets more glue onto the fibers to keep it from fraying.
Next, you’re going to attach the “T” connector to the top of the pipe you just warped. Continue wrapping the sisal tightly around the pipe until wrapping it would cause the rope to stop being parallel to the floor.
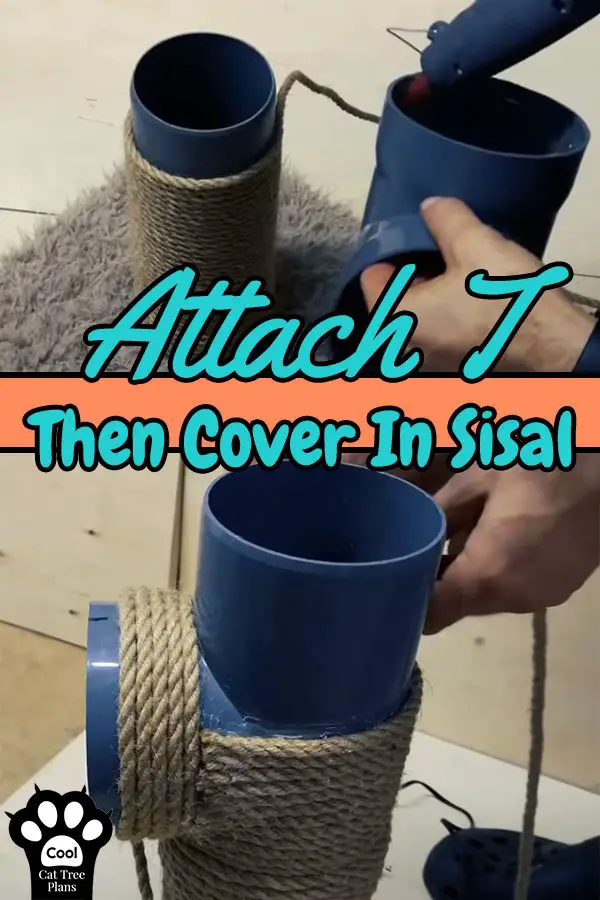
For this next step, watch the video closely because covering these joints in sisal becomes a little bit non-intuitive. Don’t hesitate to rewind and watch as many times as you need to get this right.
In order to keep all the sisal parallel to the floor and not overlapping, you are going to need to cut lengths of rope to size and glue each one into place. Remember to cut the rope at an angle and use lots of glue.
PRO TIP: Have a cup of cool water on hand to dip your fingers into before smoothing out your glue!
Continue to place individual lengths of sisal rope around the pipe until you reach the point that when you begin wrapping them once more they will be parallel to the floor.
Before you continue up, it’s time to add the elbow support for your kitties side platform. This needs to be level (parallel to the floor) so your cats can lay on them without worrying about slipping off.
Make Sure Everything is Level
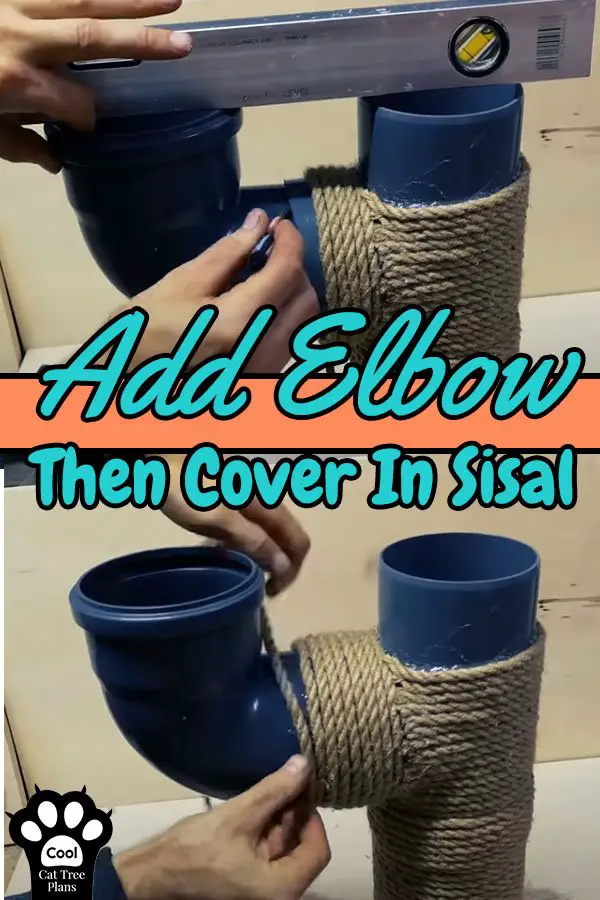
To make sure you get the elbow in the correct position, BEFORE you add any glue, slip the elbow pipe into the side opening of the “T” connector. Place the level on top of both pipes. When they are level, draw a line around the elbow fitting where it connects to the “T” connector pipe and remove it.
Now you can run a heavy bead of hot glue to the inside of the side opening of the “T” connector and insert the elbow pipe up to the line you just drew. Hold it in place until the glue sets. Then wrap/cover this pipe with sisal rope in the same way you just wrapped the “T” connector.
Place the wood you plan to use for the side platform onto the elbow pipe you just secured into place. Trace a circle onto the bottom of the plywood with your marker. Flip the wood over and secure one of the caps, flat side down, inside the circle.
Cover the side platform with fabric in the same way you covered the base back at the beginning of this build. Set it aside for now. If you glue it into place right now it will make wrapping the center pole difficult and you won’t be able to properly weigh down your cat tree.
Run a heavy bead of hot glue to the inside of the last piece of straight pipe. Slip it over the top of the top opening of the “T” connector. Wrap sisal rope tightly around this straight pipe up to the top. Just remember to leave enough room for the final cap to fit down over the pipe.
Building the cat bed that perches at the top of your cat tree has a few steps but it isn’t hard. Just take a deep breath, follow along, and before you know it your cats will be lounging in the comfortable lap of luxury!
Building The Cat Bed
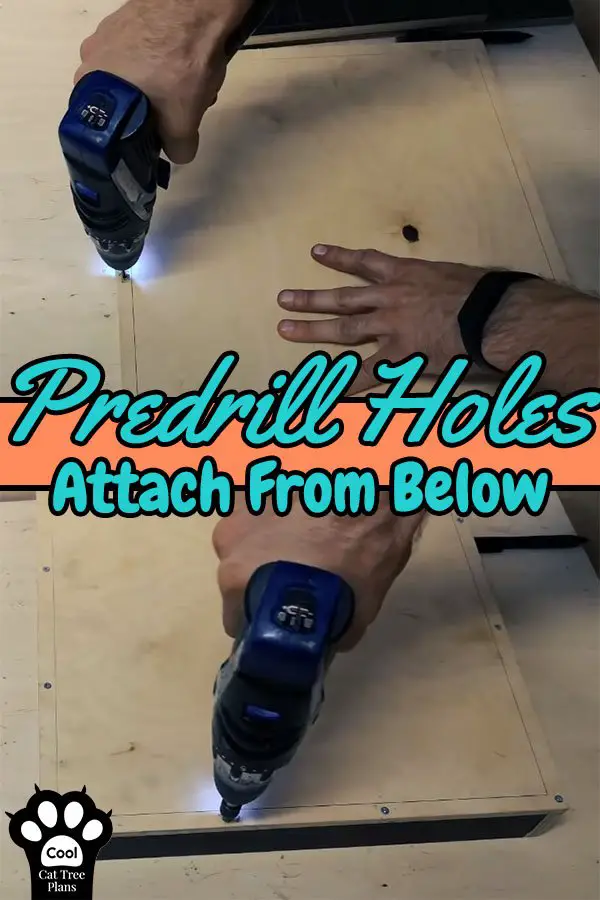
To secure the raised edges onto your cat bed box you are going to have to drive screws pretty close to the edge of your plywood. In order to do this without splitting the wood, we’re going to predrill the holes.
So, take the strips of wood you are using for the sides of your cat bed box and hold them in place along the edge of the plywood bottom of the bed. Using a pencil, draw a line along the inner edge along all four sides.
Drill a pilot hole in each corner of this piece of plywood and 2 other pilot holes along each side.
Carefully set the bed base on top of the wood strips and secure them with screws from the bottom. The screws need to pass thru the pilot holes into the strips of wood. Be sure to watch this part of the video below a few times to be sure you understand this bit.
After the sides are attached, fit the foam into one corner and using a box cutter or other SHARP KNIFE cut along the other two sides of your box. Push the cut foam down into the cat bed.
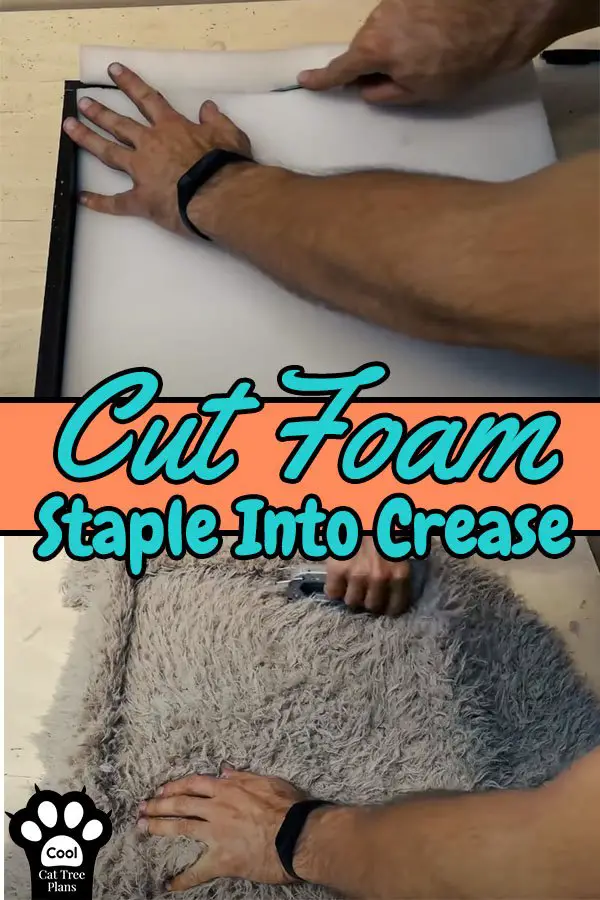
Cut your last piece of faux fur or other fabric to fit over the top of your cat bed giving yourself a good 4 inches of overlap on all sides.
This next part sounds more complicated than it is. Watch the video if you feel confused at any point.
With the fabric spread out over the top of your new cat bed box, tuck it down into the crease between the foam and the wood sides. Staple along the creases on all four sides.
Flip the cat bed over and wrap the fabric around to the back and secure it with your staple gun in the same manner you did with the base and the other platform.
Screw the last PVC cap cup to the bottom center of the cat bed box. Again, don’t skimp on the screws here.
Finishing Your Cat Tree
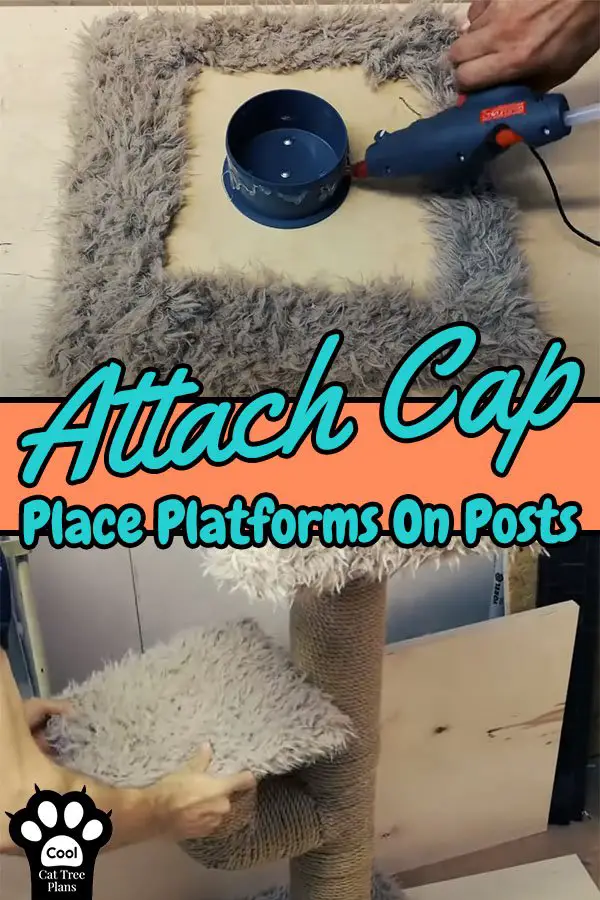
Place a heavy bead of hot glue around the inside edge of the cap affixed to the bottom of the cat bed and press it onto the top of the tallest pole on your almost completed PVC cat tree.
One of the best things about building your new cat tree out of PVC is that it’s easy to add a counterweight to keep it from tipping over.
Pour rocks, gravel, or sand into the opening on the elbow joint on the side of your cat tree. We recommend using play sand which any home improvement store will stock or aquarium gravel for this.
Why Use Rocks In Your PVC Cat Tree?
Here’s why… It’s easy to get. Weighs a lot. Is easy to pour. And you can get a lot of weight into a small space because it won’t have lots of air pockets. Also, it shouldn’t rattle much when your cat bounces around on his new cat tree.
Ready for the last step?
Run a heavy bead of hot glue around the inside of the cap you attached to the bottom of the platform you set aside earlier. Press it firmly down over the opening on the PVC elbow joint you just poured your counterweight into.
Stand back and admire your work!
Congratulations. You just learned how to build a PVC cat tree for a small space. All that’s left is to place it into your home, add some toys and introduce your cats to their new favorite place to nap. We recommend sprinkling a bit of catnip onto the platform and into the cat bed box to get the party started.
PRO TIP… Don’t Recreate The Wheel!
Want to build your own dazzling pet furniture but need a bit more hand-holding or options than we’re able to offer here? We have just what you need (including 150 woodworking lessons that’ll have folks thinking you have Woodworking Super Powers! Check out this short video… RIGHT HERE!
How To Build A PVC Cat Tree (Video Instructions)
We absolutely love seeing what folks make from our DIY cat tree plans. So, when you make this PVC cat tree for your home please document your process and send us pictures so we can show them off!
Pin This PVC Cat Tree Tutorial So You Can Find It Later!